Thursday, June 27, 2013

Corset-a-long: The Mock Up


To properly fit a corset you need to make a mock-up.  I like to make my mock-ups out of cotton duck, which is sturdy yet not too expensive (especially when compared to coutil).  To make a mock-up cut out all of the pieces, being careful to keep the waistline on the grain.  I like to leave an excess of about 1" on top and bottom, but that's my preference.  Mark the waistline clearly with an indelible mark (I like sharpie).  Then sew all the pieces together.  Instead of inserting a busk sew the center front together.  Either sew your lacing strips to the back panels, or sew in the eye side of hook-and-eye tape, or add extensions so you can pin the back closed (there should be a 2" gap in back, so add 1" to each side plus enough seam allowance for you to pin).  Then try on the corset and make sure it fits all the way around.  After the first fitting and all circumference adjustments are made then bone each seam (I like to use cheap satin ribbon and zip ties.  They don't even need to be cut to length, they can stick out the top and bottom.  You can re-use the bones in your final corset, though, you won't be making the boning permanent) and fit it again boned.  Tomorrow we'll go over how to do that!

Tuesday, June 25, 2013

Corset-a-Long: Lacing Strips Tutorial

Ever wonder how you can fit a corset when it laces up the back?  Since a corset should have 2-4" of gap in the back for the lacing "spring" it can be difficult to bridge that gap while fitting.  Some people add the gap back in and pin it shut, but that doesn't accurately reflect the flexible nature of lacing or show you where tensions properly lie.  The best way is to lace up the mock up just like you would the final corset.  Setting all those grommets is a waste of time and money, though.  To make up for that make a pair of Lacing Strips to baste to your corset.  They're quick to make, and you can re-use them over and over for corset fittings without wasting a ton of grommets.


As you can see lacing strips are really simple.  Cut two strips of fabric 8-ish inches wide by 12-20 inches long.  Fold them in half and sew a seam 3/8"-1/2" from the fold (I use the width of my presser foot from the needle in middle position and it works really well).  Sew another seam 1 - 1 1/2" away from that, then sew another seam 3/8" -1/2" from that.  Put bones in the 1/2" channels and finish all the raw edges (I serged them, you can zig-zag just as easily.  I don't recommend pinking because you'll be picking these out a lot so the edge will ravel).  Then set grommets every 1 1/2" in the gap between the bones.

That's it!  You've made a pair of lacing strips!  Now you can baste them to your pattern where the grommets go so you can lace up your mock-up just like your finished corset.  If your lacing strips are too long just let the top/bottom hang off.  I like to center mine, but it's really a matter of taste.  The important part is to just lace the grommets where the corset is, so don't try to lace up any gap, just let it sit there so that it doesn't pull strangely on your mock-up.

Monday, June 24, 2013

Pattern Update: Simplicity Early Autumn 2013

Am Disappoint with this collection.  Hopefully Autumn will have all the costumes.


Retro blouses with kimono sleeves.


Flowers.  Andrea Schewe has been featuring these on her blog, they look like they could do some neat things.

Pattern Update: McCalls Fall 2013

New Patterns are up!


Cute boys' Wizard of Oz.  Too bad there's no matching men's, I can see this being versatile.


Not crazy about the apron, but its a cute purse!


Not a costume, but I love this coat.


Merida pattern.  Not bad, really.


Once Upon a Time costumes.  These look versatile, too.


Generic boys' stuff in many variations.


In all not a bad set of costumes.  At least they're nothing like what they've got, and I bet you can make a lot of cool things from those coat/dress/pant outfits.

Monday Progress Update: June 10

Got a little more work done on my stays this week, but mostly I've been writing corset-a-long entries and reading Game of Thrones :P


 I've deviated a lot from the JP Ryan instructions on how to put this corset together in an attempt to make the corset a little more historically accurate.  After boning each piece I folded under the side seams and whipped them down to the lining.


Then I used heavy upholstery thread to whip the pieces together.  You can see on the top left how I started binding.  I'm binding using silk thread and chamois leather.  I love chamois for binding because it's buttery smooth, strong, and eases around curves beautifully.  It's also pretty readily available (you can find it in car departments/stores, they're used for washing cars) and fairly cheap!

Corset-a-Long: Tools and other Materials

Got a little behind, but we'll catch up on mock-ups on Wednesday!  Tomorrow I'm going to add in a tutorial on making lacing guards, which will make corset mockups much easier.


Needles

sewing.about.com
I like denim needles because we're using some pretty heavy-duty fabric.  Have more than one because they'll break.


Pins

shiboridragon
I recommend silk pins because they're thin and they make small holes.  It's especially important if you're using a delicate silk fashion layer.


Scissors

gingher
Use your best scissors.  You need something that is strong and yet cuts a smooth and accurate line.


Safety Glasses

sciencenc.com
When you break a needle on a bone you'll be happy for eye protection.  I can't count the number of times I've had a needle shard ping of my glasses.


Grommet Setter


seattlefabrics
 (We went over this with grommets, but I wanted to say it again)  My favorite is an anvil and a driver. These are sold in sets for $20-$30 USD. Some people prefer pliers, which usually run $15-$40 a set. I don’t like them because it hurts my hand to squeeze them together, but some people prefer that to the risk of hitting a finger with a hammer. Pick whichever scares you the least. The last method is a table press. Professionals use these machines. They are basically the pliers set into a base that sits on the table, so you can throw your weight into the press. They are very nice, but also costly, $100 +. I’d save this purchase for when you are an experienced corset maker and know you’ll use it in the future.


Awl/Stiletto


numinus.com
An awl is useful for spreading holes for grommets and for putting in the busk.  In a pinch you can use a sharpened pencil, chopstick, or something similar, but an awl is not expensive and you'll find all kinds of sewing uses for it!  There are some at your fabric store, but they're cheaper at the hardware store (but can be hard to find).  Look for one that has a really gradual point because it'll be easier to use to spread fabric.


Hole Punch

rajhanstools
Useful for putting in holes for grommets.  Ones with different hole sizes are useful because you want to make your holes smaller than the grommet and then spread the threads.  My favorite is a leather punch set from Tandy Leather.


Bolt Cutters/Tin Snips

ridgid.com
Necessary if you'll be cutting your own boning.  Look for heavy-duty ones with big, comfortable handles and serrated blades.

Friday, June 21, 2013

Corset-a-Long: Materials - Tapes and Others

There are a few other things that you're going to need for your corset:

Bone Casing


farthingales
Bone Casing is what holds your bones to your corset.  The easiest material for this is pre-made bone casing.  It's woven into a strong, light tube and has two "flatten marks" that you can sew along to attach it to your corset.  You buy it by the yard at most corset supply places.


Alternatives


There are alternatives to traditional bone casing though.  If you're using plastic boning it will come with a casing.  You can also use grosgrain ribbon (but not satin, it's too thin and the bones break through too easily).  You can use a tightly woven twill tape as well, or cut your own from the straight-of-grain of a strong fabric like a twill.  The problem with cutting your own is that bias cuts tend to bag and let bones twist, but straight-of-grain doesn't smoothly curve.

Twill Tape

fabric.com
Twill tape is a 1"-2" "ribbon" woven like coutil.  It is strong and non-stretchy, and great for waist tapes.  Cotton is going to be much more comfortable than polyester.  If you want one you'll need a yard to a yard and a half.


Petersham Ribbon

farthingales

Another alternative for waist tapes.  Petersham is a bit more flexible up-and-down, so it's a bit more comfortable than twill tape.  Be sure to get cotton or mostly cotton.


Laces


After your grommets or eyelets, you’ll need a cord or string to lace them together. There are many different things you can use for corset lacing. If your corset is short with few holes you may get away with shoe or boot laces from your local department store. Specialty shoe stores sometimes sell longer laces, so check there too. You can buy numerous different types of corset laces from corsetry supply stores online. You can also buy soutache braid by the yard at your local fabric store. Some other ideas for by-the-yard cords: parachute cord, gross-grain ribbon, satin ribbon, and drapery tie cord. Just find what works for you, your only real limit is that the cord has to fit through your grommets or eyelets and stay tied in a knot. Be sure that whatever you use has tips on the ends so the fabric or material doesn’t fray. You’ll be putting a lot of abuse on these laces every time you put them through a hole, so protect the ends. If your laces are bought by-the-yard there are plenty of methods for making a tip on them. You can buy professional liquid tipping solution or cramp-on metal pieces called aglets. Just be sure that whatever metal piece you get will fit through your holes. You can also get heat-shrink tubing at many corset supply places or in the electric section of a hardware store.  You can also use superglue to dip the ends in. Just be sure you don’t stick the laces to your fingers!

Thursday, June 20, 2013

Wednesday, June 19, 2013

Corset-a-Long: Materials - Busks

A busk is not vital to a corset, but it does make things a lot more comfortable!  It used to be that there were only two kinds of busks out there, so choosing one was easy, but nowadays there are tons more choices:


Wooden Busk

corsetmaking.com
This is a straight piece of wood used to keep the front of a corset straight.  It is used for 16th ct - Regency corsets, so earlier than this corset-a-long.


Standard Separating Busk

corsetmaking.com
This is a busk that has posts on one side and loops on the other so that it opens and closes kinda like buttons.  It makes a corset much more comfortable to put on and off because you can undo the laces a little bit and put it on around your body as opposed to over your head..  Because of this corsets with a separating busk can use much shorter laces than those with a closed front.  Traditional busks are white with silver clasps, but there are now busks in a ton of clasp colors including brass, antiqued, black, and even studs with diamonds in them.  When holding a busk remember that the busk closes like a button-up shirt, so the studs should be on the left hand side of the wearer.  Some busk lengths have two clasps closer together on the bottom.


Heavy Separating Busk

farthingales
A heavy busk uses thicker, stiffer bones than a standard busk.  It creates a more rigid front.


Spoon Busk


farthingales
Spoon busks were invented to provide more stomach control with a thicker, rounded bottom.  They are historically accurate mostly for the 1880's.  They are also the most expensive type of busk to buy.


Conical Busk


corsetmaking.com
As a cheaper alternative to Spoon Busks modern corset suppliers have created the conical or tapered busk.  The clasps are attached to bones that are thinner at the top and thicker at the bottom to provide stomach control with less cost.


Tip

Keep in mind that a busk can always be made stiffer by slipping stiff bones into the casing along with the busk (this is usually called an underbusk).  Also it can be more comfortable to only stiffen one side of a busk (usually the stud side), keeping the other side more flexible to make it easier to open and close.  This might make the corset lopsided, though, so beware.


My Corsets


I'll be using a standard busk in my Truly Victorian and a spoon busk in my Silverado.  For the straight-front corset I'll be using an underbusk to keep things straight and help with the silhouette.

Tuesday, June 18, 2013

Monday Progress Update: June 17

Mostly, I've been working on blog posts this week.  Wanna get ahead for the corset-a-long!  I have accomplished a bit, though:


I cut a set of 18th ct. stays from the JP Ryan pattern.  I need to get these done so I can fit my dresses for Costume College!  I  cut them from white cotton twill and a tan  linen lining, and so far I've quilted the boning channels and added the steel bones.  They're going to be fully boned, but only half with steel and half with plastic so they're lighter and a bit more comfy than full steel.


I also found my boning!  This was the big accomplishment of the week.  A lot of people seemed interested in my boning storage at Dress U, so here it is!  It's a large pvc pipe that I cut down into individual pipes and glued together.  It's very heavy, but I like how all the bones are readily accessible.  Since I use boning a lot (pretty much in every costume) I don't mind the loss of counter space for it.

Boning update

I don't know why it reverted to format and picture-less, but I've updated the boning post to be how I wanted it.  Also realized I mixed up rigelene and feather boning, so I fixed that.

Corset-a-Long: Materials - Boning

Plastic Boning


sewing.co.uk
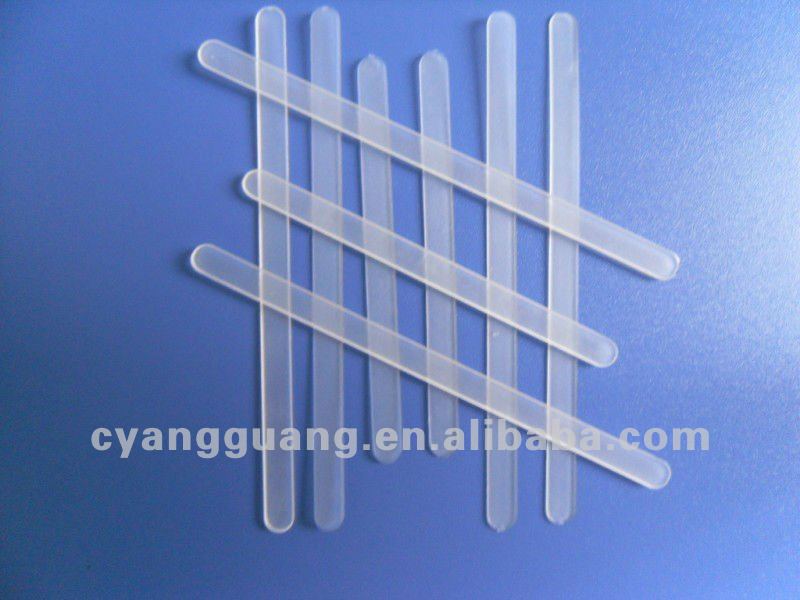
The most easily found type of boning is plastic. Some varieties are commonly sold in fabric stores, so they are easy to find and easy to use. The most common is rigelene. This is made up of thin tubes of plastic in a grid pattern. This boning is very lightweight and flexible. You can sew through the boning with a regular sewing machine. The boning will conform to the curves of your body with wearings. The downside to this boning really is its flexibility. This boning is really too flexible to hold up to the pressures and tensions involved in corsetry. I’ve used it selectively in places I want gentle curves, such as the bust curve of a bodice, but I always use a sturdier boning on the major seams and lines to re-enforce the feather boning. Another major downfall is plastic’s tendency to learn curves. It can be good, but it can be very bad, too. I’ve had plastic learn the ‘curves’ of my tummy roll, which is definitely not flattering OR what I intended! For this reason I mainly reserve feather boning for the bust area.
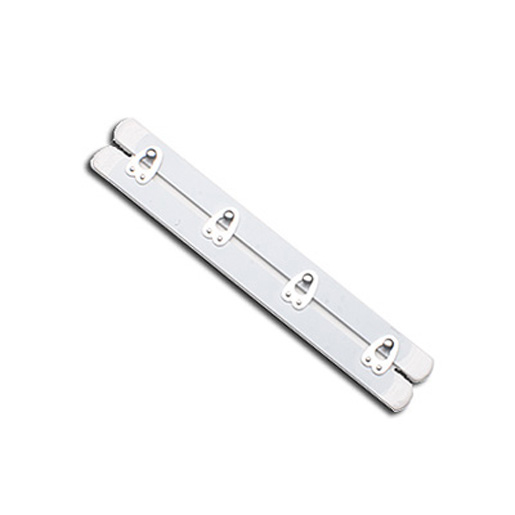

Hancock fabrics
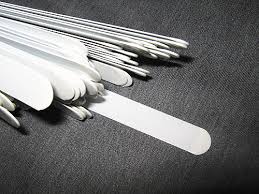
The next step up in quality is feather boning. Feather boning is also plastic boning but in a fabric casing, and this style is one solid piece of plastic. It can still be sewn through, although a lot less easily, but it’s stronger than rigelene and less likely to learn a curve. Make that slightly less likely. I pretty much group both Rigelene and feather boning into one category usage-wise. Both come in large rolls in the fabric store and you buy what you need by the yard. Usually the fabric covering is either black or white, and those are your only options.


vogue fabrics store
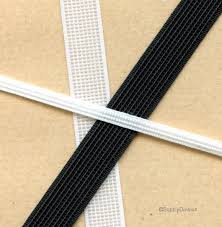
One other type of plastic boning in fabric stores worth mentioning is horsehair braid. This thin plastic braid is sold in rolls near the plastic boning. It’s really too weak for boning anything but collars and cuffs that are meant to stick out. It won’t work for structural boning at all, so save yourself the trouble.


alibaba.com
The Germans have a higher quality of plastic boning that is available in corsetry and costuming supply stores. This German Plastic Boning is stronger and less likely to learn curves than Rigelene or feather boning, but is still washable.


vogue fabrics store
The highest quality of plastic boning is Plastic Whalebone. Whalebone is the authentic boning used in historical corsets. Because of endangered species and poaching, owning enough whalebone to make more than one corset is illegal (kinda, it's kinda legal in theory in the US but I've not found a place to legally purchase it). You can still buy it, but usually it is stripped out of older period corsets or bodices. Since the demand is still there for a boning that works like whalebone, a plastic version has been invented. I’ve never seen real whalebone to make a comparison, but the rumor is that plastic whalebone is the best alternative available, although it’s still not a very good substitute.

There are a few things to remember when working with plastic boning of any kind. The first is that it comes on tightly coiled rolls. Even when unrolled, the nature of plastic boning means that even after you cut the pieces the curve will still be there. There are a few ways to counteract this. Most patterns will recommend that you just ‘switch the curve’ on each bone as you sew. This means sewing one bone with the curl of the boning curving in toward your body and the next bone with the curl curving out. This generally works best if the bones are placed right next to each other. Another good method is to cut one or two yard pieces and place the ends under heavy furniture for a few days. I like to cut pieces the width of my bed and place them under the wooden 2x4x24” blocks that I have under the footboard to make my bed level. The weight of the furniture will keep the boning straight and it will ‘learn’ not to curve. This can be coaxed in stubborn boning by carefully heating the stretched boning with a hairdryer. The heating and cooling process helps the boning to mold straighter. You can also iron plastic boning on low heat until it is straight. This can be a delicate process, though, because leaving the heat on too long can cause the boning to curl back toward the iron, and too high of a heat can melt the boning. This is particularly dangerous with horsehair braid and feather boning because the plastic filaments in them are so thin.

When I need to use plastic boning, I place it in a sink of very hot water for a few minutes. then place it on a flat surface with a book on top of it until it's cooled to straighten it out....if you need to put a curve into one area (like over the bust), then I reheat just that section after I've flattened it and tape the rewarmed section over an appropriately sized can's side until it cools and holds, carefully ironing.  I double-bone and overlay them, so the one going THIS way has another one going THAT way atop of it. That way they sort of cancel each other out in terms of bending, and become nice and straight.
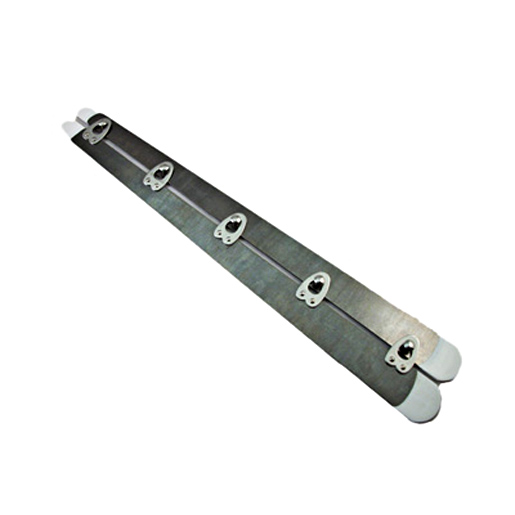

Metal Boning


vogue fabrics store
The next type of boning is metal, which is highly recommended for our type of corset. There are two major types, spring steel and spiral steel. Both are durable and long lasting. Spring steel is the industry standard for corsetry. It is made from sheets of steel that are cut into thin strips, and then cut to length. The ends are filed into rounded tips, the metal is coated with a thin enamel to prevent rust, and the ends are dipped in rubber coating. It is commonly found in ¼” and ½” widths. The ¼” bones are a little thicker, and a little stiffer, in my opinion. The main decision to use one over the other is purely design. Does it work better for your pattern to have bigger bones or smaller ones? Most commercial corsets will use one ½” bone on each seam or two ¼” bones, one on each side of the seam. The main thing with metal boning is to make sure your boning fits the boning channel fabric you bought. You want a snug fit without forcing the boning through the channel. If the channel is tight, not snug, it will get tighter when pressure is put on the corset from lacing it up. This will cause the boning to wear through the fabric much sooner.

Metal boning in the United States is mainly bought by mail order. Corsetry supply sites sell in one or half inch increments. Some shops from Canada and Europe sell by millimeter increments. Some have bulk prices for bones bought by the dozen or gross. Others have longer or shorter bones. Prices vary greatly as well, so shop around. You need to know how many pieces and what lengths you need before you order.  The best idea is to make the corset base first, then measure the channels and order the boning. This takes time but ensures you get exactly what you need without spending too much money.


corsetmaking.com
The other metal boning is spiral steel. Spiral boning resembles a slinky that has been smashed flat. It is slightly more expensive than spring steel, but has the advantage of being more flexible. Spiral steel flexes left-to-right as well as front-to-back. Like spring steel, it also comes in ¼” and ½” widths, although the ½” is much more common. Most corsetry suppliers sell it in 1” or ½” increments. Spiral steel’s main disadvantage is washability. The metal isn’t coated with a rustproofing material, so it’s not very washable. The bones will sometimes come with a rust-resistant coating of oil, but this coat will wash away in the first wash, leaving your steel unprotected. It can also stain your material, so I always rub bare metal boning with an old scrap of cotton to remove any traces of oil and grease.  Spiral steel’s flexibility allows me to still touch my toes and sit down, but it doesn’t learn the curve like plastic boning.

You can also buy spring and spiral steel in spools.  The spools can be cut to any length you want. You snip the wires with wire cutters or tin snips and cover the cut ends with special u-tips crimped on with pliers. The tips can be bought by the dozen or the gross wherever you buy the spool of boning.  An alternative to the u-tips is to dip the ends in a plastic compound for extra blunting. There are a few compounds you can use. The most common is Tool Dip. This is found in the hardware section of the store. It’s a plastic/rubbery liquid used to restore the handles of screwdrivers, hammers, and other handgrips. Be sure to use it outside and wear a mask, the stuff is powerful. Just dip the end of the boning in the compound, shake off the extra, and hold it out for a few minutes. I try to do it around a box where I can put a weight on one end, leaving the other hanging off the edge of the box. If you do this just be sure to turn them over the first five minutes, or the dip will coalesce on one side. Non-toxic alternatives are layers of acrylic paint, which you would apply just as the tool dip. I’ve also heard of people using duct tape, masking tape, or medical tape in a pinch. This wouldn’t be good for a long-term corset, I would think, and especially not one that will be washed, but for one or two uses it’d be fine.


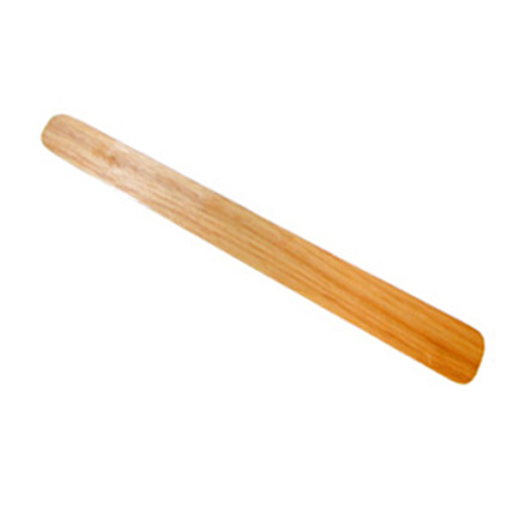
Alternatives to Traditional Boning


If buying boning in pre-cut lengths doesn’t seem like your thing, there are plenty of cheap alternatives available. For most of them you will have to put in some time cutting, sanding, or coating to get a good product, but if you’re on a tight budget or time crimp these may be worth it.


tech-faq.com
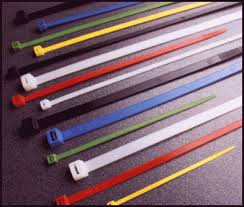
The best place to look for boning is your local Home Depot or hardware store. If you are looking for sturdy, washable bones, try to find plastic cable ties. These long plastic strips are so strong and durable they are often used as makeshift handcuffs by the police. To use them as boning just cut to length, sand off burrs, and melt the end in a flame to make a rounded tip. The ends can also be softened with a soldering iron or wood burner. In a pinch you can use an iron set on high, although you will never be able to iron clothes with it again. Be sure to do this step outside, though, because the fumes can be nasty. If you have breathing problems, just skip it. It’s not worth the asthma attack.


artsupply.com
Another source of sturdy plastic boning is ABS or Sintra plastic. If your hardware store doesn’t carry it, look for a sign making store or supplier. This plastic comes in large sheets, and sign makers heat-form it to make raised signs such as the McDonalds Ms. It is also used in hard costuming for armor for stormtroopers and SCA fighting gear, so if you have trouble finding some, consider contacting one of these local groups. The plastic will come in many different thicknesses and flexibilities, so pick the one that suits your durability. Personally, I’d never go with one so thick I couldn’t cut it with scissors. This makes it easy to work with and flexible enough to still be able to flex the bones. To make boning, just cut to width and length and round the edges. This is easier with a razor or box-cutter and a straight edge, like a metal ruler. Some stores will sell scraps for a pittance, or even give them away, and some places will require you to buy a whole sheet, which should do at least 10 corsets. Shop or call around for good prices if you’re looking to be thrifty.

Study plastic boning can also be found in the lumber section. That’s right, where they keep the wood.  Go look around a bit under the racks. Stores use long strips of plastic or metal to hold the groups of logs together on the trucks. When it gets to the store, they cut it off and throw it away or leave it under the racks to throw away later. If you can’t find any, ask a clerk. They’ll usually give the stuff away, since it’s trash to them anyway. Make sure that the plastic is thick like a cable tie, not thin woven stuff.  Treat the plastic variety just like the cable ties or ABS. The metal variety is workable; you’ll just need a few tools. Wipe the metal with a clean cloth to get off anything gross that’s left over from the trip, and then cut to length with tin snips. Use a dremel tool or other sanding device with a sturdy bit, or a metal file, to sand off the corners into something somewhat round. Lay them flat and spray paint with enamel paint, or brush on regular enamel or acrylic paint. Turn over and repeat, and do a few coats.


fish - instructables.com
There are also other metal strips out there that are similar to wood strapping. Electricians’ Fish, Drain Cleaner, and Steel Snakes usually have varieties that are thin spring steel. Crate packing also comes in long rolls of bare metal. There are other alternatives that require more work. You can use band saw blades and file off the serrated edge, and then cut to length and coat. The metal bars off of hanging file folders just need to be cut to length and coated.

Monday, June 17, 2013

Corset-a-Long: Materials - Fabrics

Base Fabric

The main fabric in any corset is the base fabric. This layer is the strength of the corset; it allows you to tighten and re-distribute. There are very few choices for this layer. Most fabrics available are too weak or loosely woven. The base fabric will also be close to your skin, so you want it to breathe and be comfortable. In your basic fabric store there are few fabrics that fit this description.


rawdenim.com
The first fabric to look at is denim. Denim is strong, cheap, and readily available. However, it has some disadvantages as well. Denim sometimes has polyester in it. The higher the polyester content, the more uncomfortable the fabric will be with extended wear. Denim also stretches with wear and shrinks with washings. Finally, Denim usually only comes in shades of dark blue and black. A darker color base fabric will show through a white or light outer fabric, which just looks bad.


gs-designe.se
Another choice that is commonly available and very affordable is Canvas. Canvas can be found in the utility fabrics section near the fake furs and bolts of felt. Be sure you are looking at regular canvas, or cotton duck, not the slick, shiny outdoor canvas. Canvas is a good alternative to denim because it is usually all-cotton, thinner than denim, strong, and comes in a variety of colors, including white, black, red, blue, and natural, which is my favorite because it closely matches my Scandinavian skin tone. Canvas is a lot like denim in that it shrinks with washings and stretches with wearings. I think it also frays more than denim while you’re working with it.


farthingalescorsetmakingsupply.com
The higher-priced end of the base fabric spectrum is Coutil. Coutil is not usually available at a basic fabric store. Look for it in higher-end shops and bridal fabric stores that carry quality silks and laces, as well as online at corsetry-supply sites. Although coutil is more expensive, it is better for corsetry because of its weave. Coutil has a special herringbone weave that makes it very strong. It doesn’t shrink or stretch nearly as much as denim or canvas, so it provides a sturdy, non-stretch base for long-use corsets. The downside is that coutil usually costs at least twice as much as the other alternatives, or $20-$35 USD per yard. It also comes in a few different colors, mainly white and black. Sometimes a ‘flesh’ color is available, but again it’s a pale cream that only matches the sun-impaired, so it’s not skin-tone for the general population. Coutil’s high cotton content means you can easily dye it, but sometimes the fabric comes with a stiff pasty finisher on it that prevents dye from sticking or spreading evenly.

So how do you know when you need to spend the extra money for coutil? It all connects back to your purpose. The longer you want your corset to last, the more quality you want in your base fabric. For a corset you’ll wear every day coutil is the only choice if you want your corset to last. For a piece that will be under a lot of stress, like the extreme waist reductions involved in tight-lacing, you may even need more than one layer of coutil. For a one-time costume piece, however, canvas or denim may be a better choice because it is cheaper.


Lining Fabric

Next you need to decide if you want a lining fabric. The point of a corset lining is to protect the base layer from the salts and sweat on your skin and to protect your skin from the rough base layer and scratchy seam allowances. Because many historical corsets are worn with a chemise underneath a lining is not really necessary (and not historically accurate).

If you decide on adding a lining think of natural fibers.  Natural fibers are even more important in this layer because they’ll absorb sweat and moisture instead of trapping it against your skin. You also want the lining to be thin and lightweight so it doesn’t add a lot of bulk to the inside of your corset.


rosebrand.com
The best weave to look for is a straight on over-under 1:1. Cotton fabrics that have this weave are broadcloth, muslin, voile, batiste, and sheeting. Muslin is usually the thinnest and weakest, but it is also the cheapest. Muslin usually only comes in white and natural, although it is very dyeable. Broadcloth has a large variety of colors and is durable and strong, but you have to be careful to check the fiber content because the quilting broadcloths sometimes have some polyester in them. Batiste is a little more expensive, but it is thinner with a fine weave. It usually comes in white or black, but sometimes you can find colors and you can dye it if you wish. Voile is more expensive than any of these, and usually has to be mail-ordered, but its tight weave and smooth finish make it stronger and more durable. Sheeting can be found at your fabric store or in your bed sheets. If you are looking for a quality, cheap alternative to the fabric store bed sheets from home or the thrift store can be cut for lining. Sheeting’s disadvantage is that it is usually thicker than the other three.
Any of the above should be dyeable due to its high cotton content. Colored linings, however, can bleed and dye your skin or any clothing worn under the corset. To help prevent this, wash your fabric three or four times with hot water and soap. If you have access to Retayne™ or Synthrapol®, or a similar product, use it in the loads as well. This will probably fade your fabric somewhat, but I don’t think it will matter because no one will see your lining fabric when you are wearing your corset. Dye down the drain is better than dye on the skin.

There are some alternatives to cotton fabric. Linen is commonly used in historical reproductions. Linen is stronger than cotton, but it’s more expensive and usually has to be mail-ordered. If you are trying to recreate a pre-1850s historical piece, however, linen is much more authentic. Look for lightweight or handkerchief weight, which is thin and light. Silk can also be used. Habotai, or China Silk, is strong but thin and slick. The tight weave is not as good about wicking moisture away, and its slick texture is harder to sew, but the smooth weave makes it ‘glide’ more against under layers. Crepe De Chine is similar to Habotai but not as strong. Silk broadcloth and sueded charmeuse are closer to cotton in weave and behavior, although silks are generally not as strong or durable. To get silks, look for a bridal fabric store or search online for silk fabric.


Fashion Fabric

The final fabric you need to pick is the fashion fabric. Again, this layer is not necessary.  I've done plenty of corsets where the coutil is the only layer of fabric.  There are plenty of historical garments done this way, too.  There are, however, many examples of historical garments that have a fashion fabric layer, too.  The fashion fabric is the outer layer that shows when you wear a corset. For this you can pick pretty much anything you want. Historically silk taffetas and satins were popular.  Nowadays dupioni is done for a lot of fashion corsets.  I’ve even been known to layer a few fabrics together, like a pattern under a sheer, to get the effect I want. The only think I would recommend against is knits. Stretch fabrics have a tendency to bag over use. If the fabric you choose is weak, especially acetate, you can fuse it with interfacing to strengthen it. A great resource that outlines tons of different types of fabric is Sandra Betzina’s Fabric Savvy or More Fabric Savvy. It helps you to know the strengths and weaknesses for tons of different weaves and fibers, as well as stitch lengths and recommended needles.

Silk Taffeta - renaissancefabrics.net
Silk Satin - orifashion.cn


My Corsets

I'll be using coutil on my corsets and canvas on my mock-ups.  I'm going to make the Silverado with a silk fashion layer, but I haven't decided between dupioni and taffeta yet.

Sunday, June 16, 2013

Corset-a-Long: Material Suppliers

Here's a list of places to get the materials we'll be discussing this week:


US Corset Supply Sources

In alphabetical order:

Abraham's Lady - Gettysburg, PA.
www.abrahamslady.com
Steel bones, busks, lacing, fabrics

CorsetMaking.com - Philadelphia, PA.
www.corsetmaking.com
Steel bones, spiral bones, busks, grommets, lacing, fabrics, bra supplies, patterns
Unique items such as colored grommets.

Farthingales (ships through Vogue Fabrics Store) - Evanston, IL.
www.farthingalesla.com
Steel bones, spiral bones, busks, grommets, lacing, fabrics, patterns, beginner kits
Unique items such as brass busks, diamond busks, wide and spoon busks.

Fitting room - Seattle, WA.
www.fittingroomcorsets.com
Steel bones, spiral bones, busks, grommets, lacing

Grannd Garb Corset Supplies - South River NJ.
www.granndcompanies.com
Steel bones, spiral bones, busks, lacing, fabrics, patterns

King and Company - New York, NY.
www.etsy.com/shop/KingAndCompany
Steel bones, spiral bones, busks, grommets, lacing, fabrics, patterns

Lacis - Berkeley, CA.
www.lacis.com
Busks, grommets, fabrics, patterns

Richard the Thread - Culver City, CA.
www.richardthethread.com
Steel bones, spiral bones, busks, grommets, lacing, fabrics, patterns, bra making, garter making, underwires, powernet, etc.

SewSassy - Huntsville, AL.
www.sewsassy.com
Bra supplies, garter supplies, fabrics

Tutu.com - Charlotte, NC.
tutu.com
Spiral bones, fabrics

Access this entire list with hyperlinks and personal recommendations at corsetmakers.livejournal.com/1968808.html.  There are also other threads with non-us sources.


For fashion fabrics, my favorite silks are from Pure Silks and Renaissance Fabrics.  I get a lot of dupioni from Silk Baron and Fabric.com.  I buy linen from Fabrics Store.   I often get other utility fabrics from JoAnn's.  Just be sure to look up recommendations for wherever you buy, there are some crappy places out there.  Share your recommendations and favorite places in the comments!

Birthday Giveaway

I missed my birthday yesterday, but I still want to do a giveaway this year!  I've got an extra copy of this book, and it's pretty wonderful, so it will be the prize this year:


It's been up as the 100 follower prize, but since Google is getting rid of followers, probably before I hit 100, I'll re-purpose it.  Here's how to enter:


a Rafflecopter giveaway


If you can't see the widget click the link to go to the main rafflecopter site.  Contest ends on June 30.  Good luck everyone! 

Friday, June 14, 2013

Corset-a-Long: Measurements

Compared to other garments our corset measurements are actually pretty simple.  We only need 3:


Bust:


Wearing a comfortable bra (not a pushup or padded) measure around your bust at the fullest point.


Waist:


Measure around the smallest part of your torso.  It's probably nowhere near where you wear your pants (as the above picture illustrates) so ignore the conventional thinking of "waist".  If it helps tie a piece of elastic around your waist and do some side bends and toe touches so that it settles into the smallest area, then measure around the elastic.


Hips:

For this measurement we're going to do things "wrong".  Instead of a conventional sewing hip measurement, which is taken around the largest point of your thighs/butt, we're going to take a measurement of the hipbones.  Few corsets reach as low as your natural hip measurement, so you want the measurement to be close to where the bottom of the corset will lie.


Picking your pattern size:

Choose your pattern size according to your waist size.  If your bust or hips are a size or two smaller or bigger you can "blend" the pattern: that means marking the size of your waist using your waist size, and marking the separate size of your bust using your bust measurement, and in between connect the two with a smooth line.  You can do the same with your hips if they are radically different.


Measuring the pattern:

Do yourself a favor and measure your chosen pattern along the waist.  Take each piece and measure the waist on it, subtract the seam allowances, and add all the piece measurements together.  It should total a number 3-6" smaller than your natural waist size.  If it's not then you have the wrong size, and keep trying until you get a measurement that is closer to 4".  This is especially important on patterns that are known to run big or small, like Simplicity 7215.